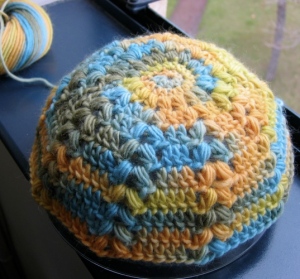
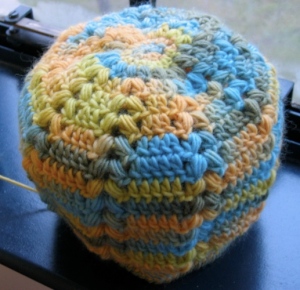
So, everyone have their yarn and hooks ready? First, let’s take a good hard look at the pattern and see what it is the pattern wants you to do. We have a diagram of a hat with two pompoms attached to it, and an arrow pointing down from the crown the head. Let’s assume that means that the hat is worked from the top down. Then we have a big circle full of crochet symbols, and above it we have some rows of crochet symbols.
If you’re not already familiar with symbol crochet, the important thing to know is that one symbol = one stitch. Starting with the big circular part of the pattern, we can see the symbols are arranged in rounds that grow increasingly larger (please excuse my terrible hand-drawn lines – my photo software doesn’t do circles).
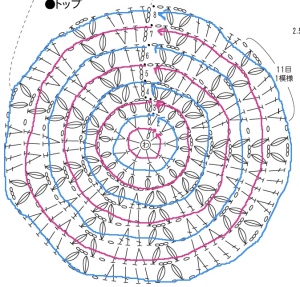
The わ symbol (pronounced wa) in the middle means that you’re supposed to do a magic loop, but really any method you know for creating a round in crochet will work. Also note that you work the rounds counterclockwise. Even without knowing the crochet symbols yet, you know a lot about the construction of the hat: it’s made in rounds that grow successively larger. Makes sense, right?
Ok, one more thing before I get into the actual crochet symbols themselves: how to identify the stitch repeat. Not only is that useful for keeping track of where you are in the pattern (it is fore me at least – don’t know about you guys), if you know the stitch repeat, you can easily make the hat larger or smaller. The stitch repeat is marked on the diagram with a bracket in the top right corner (where it says 11目1模様 “11 st 1 pattern repeat”). But even if it weren’t labeled, it’s pretty easy to spot the repeat, don’t you think?
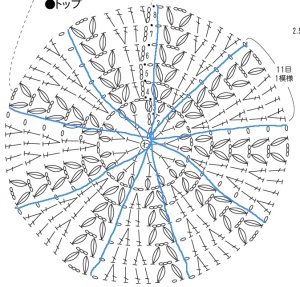
If you want to make it larger or smaller, just add/remove one or more stitch repeats. If you remember from the first lesson, this beret has a head circumference of 45cm (17.7 inches). I’ll use myself as an example for how to increase. I have a huge 24-inch head – bigger than most men’s heads. Sigh. Anyway, if I wanted to resize this child’s hat for myself, I would want approx. 61cm instead of 45. As written, it has 9 pattern repeats, which we can see from just counting on the chart. So each pattern repeat accounts for about 5cm of the hat’s size. In my case, I need to add about 16cm, so I would pick the closest multiple of 5cm, which is 15cm. So if I add three more pattern repeats – working 12 repeats instead of 9 – then the hat should fit. I’ve done this with other Japanese hat patterns, both knit and crochet, and it’s really that simple. [ETA: You can change the size of hat another way, too. Instead of changing the stitch repeat, simply add more increase rows until it fits.]
OK, so let’s get down to nuts & bolts now: international crochet symbols. Japanese crochet (and knit) symbols are actually standardized by the Japanese government (JIS, section L textile engineering), so you’re not going to find that pattern authors use different symbols to mean the same thing. (The only exception is the single crochet symbol, which has two possible forms – more on that in a sec). In my experience, Japanese patterns tend to use a few really common symbols such as chain, single crochet, and double crochet. If they use any really unusual symbols, they usually have an explanation of the stitch somewhere in the pattern. Also, Japanese crochet symbols are the same as ones used in other countries, so they really are international. (I think Japanese symbols were the basis for international ones, but I don’t really know the history.)
Below are some sites that show what crochet symbols are (you’ll find most or all of these in the Pages tab of the Japanese knitting & crochet group on Ravelry). Some of the pages are Japanese, but they include illustrations, so you can see exactly how the stitch is worked.
Note that most of them use US terms, not British ones. The websites with illustrations are especially useful if you want to make sure you’re using the right stitch.
So which symbols do we have in our pattern? Well, all we have to do is look them up in one of the symbol charts I linked to above. As I mentioned earlier, there are two commonly used variants of the single crochet symbol: it can be either an X or a + (same shape, just rotated a bit). For convenience’s sake, these are the ones used in this pattern (hope I didn’t miss any!):
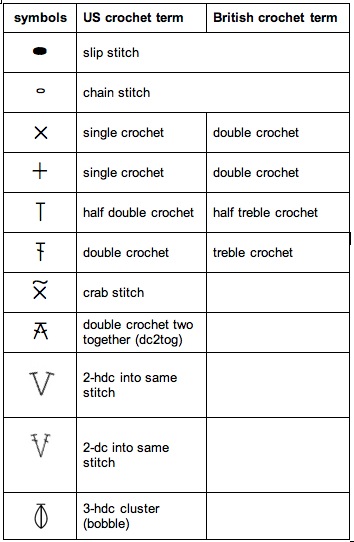
Note: there was a mistake in my table, but it’s corrected now. The sc symbol with a tilde over it is crab stitch, not sc through back loop only as I had accidentally written. The symbol for sc through back loop only is a sc symbol with a line above or below it, but a straight line. Sorry about that! They look so similar. (Also, some of the British terms were left blank because I’m not certain what they are. Do you use shell and cluster to mean the same thing in British crochet terms? If you know, please enlighten me.)
It sounds overly simplistic, but to make the hat, you just work the symbols in the order they appear, starting at the center and working counterclockwise, like so:
- make magic loop, and work 2 chains from it. Now work 8 hdc into the magic loop, and cinch the loop shut. Slip stitch into the second starting chain to join the round.
- round 2: ch2, work 2-hdc shell into each st around, hdc into base of ch-2 that started the round, slip stitch into chain to join round.
- and so on…
Finally, a word about the little table full of text in the lower right corner of the pattern. Basically, you can ignore it. It’s just a chart telling you how many stitches you should have at the end of each round. On the left of the table, we have the round number. For example, 1段め is round #1. On the right side of the table, we see 9目, which is 9 stitches. That helps you keep track of where you are, but it’s not strictly speaking necessary. Use it if it helps you, ignore it if it doesn’t.
In the next lesson, we’ll cover how to go from the circular chart to the one above it, which is displayed in rows rather than rounds of symbols. The two dotted lines connecting the two show you where they should line up, and if you look closely, you’ll see that the top rows don’t have any increases. We’re still working in the round, but they’re arranged in rows because there are no increases. I forgot to take photos while it was still light outside today, so I can’t show you my progress right now. But I’ll get photos tomorrow if I can. Feel free to post your own progress photos in the Ravelry tutorial thread.
ETA: Here’s my progress up through round 11:
