Shaping notation in Japanese patterns

OK, so I’ve neglected this blog for a while, but I haven’t completely forgotten about it. I’d like to revive it by posting a draft of a shaping tutorial I recently made. One of the most common gripes I hear about Japanese patterns – even the ones that have been translated into English – are that the shaping instructions are confusing, vague, incomplete, baffling… well, you understand the idea.

Have you ever looked at a Japanese charted pattern and been confused by what all the numbers on the side mean? For example, you might see numbers like this floating above the armscye on the schematic:

10 RE (that’s rows even)
2-4-1
2-2-1
1-4-3

They’re almost always three numbers, such as 2-1-5. (If there are four numbers, it’s because the item is worked in the round and/or has evenly spaced shaping worked in more than two locations, not just at the right and left edges of the work.) This kind of notation is used almost exclusively in knitting patterns, but I have seen it pop up in crochet patterns once in a blue moon.

The good news is that these instructions are, contrary to complaints, not the least bit vague. They’re very precise and tell you exactly when to increase or decrease (or work short rows).

You can download the tutorial right here: Japanese shaping notation (second draft 7/28/2011). You’re welcome to link to this page if you find the tutorial helpful, but please do NOT repost this tutorial anywhere online (that includes your website, blog, Facebook, Ravelry, etc.). Many thanks to Pierrot Yarns for allowing me to use one of their schematics in my tutorial.

Questions? Comments? Feedback is most definitely welcome! I consider this a draft, so I’m happy to revise it if anything is confusing. I have proofread it several times, but if you do happen to spot a typo, please let me know so I can fix it ASAP.

What’s on the needles

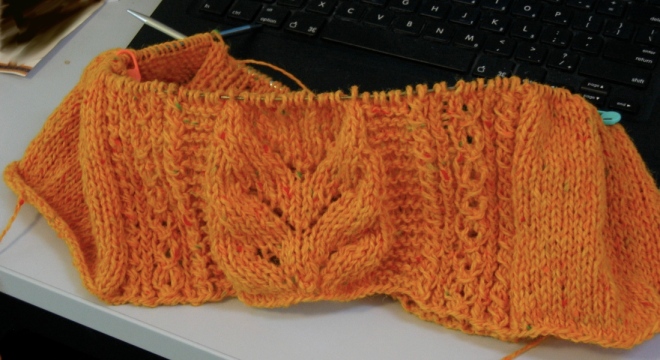
The other day I cast on for this Pierrot Yarns sweater vest (click here for Ravelry link) that’s been in my knitting/crochet queue for a long time. There’s a knit-a-long on Ravelry if you’d like to join in. I’m using some mill end tweed I got from WEBS. It’s a bit rough on the hands while knitting, but it really softens up after washing. Yet another reason to wash gauge swatches – if I didn’t know it got softer, there’s no way I would’ve chosen this yarn.

I had to resize the vest to make the bust slightly larger, but other than that, it’s pretty smooth going. I also decided to work it in the round. For me, knitting is much faster than purling, so doing it in the round speeds things up.

progress of sweater vest

It’s a lot more yellow and less orange than the photo shows. I’m pretty pleased with it so far.

I’m also doing some knitted sampler squares when I need some portable knitting. (The sweater vest isn’t very portable because the cone of yarn I’m using weighs a ton. Don’t feel like lugging it around.) I’m using up worsted weight remnants to make squares that I’ll eventually seam together into a blanket. Nothing original about it, but it’s a nice way for me to use up scraps and try out new stitch patterns.

Let’s see… what else? Oh, I picked up a copy of the new summer Keito Dama last week. Lots of cute summery crochet outfits in this issue.

Pierrot Yarns contest

I should’ve posted about this earlier, but I just wanted to remind folks that there’s still time to enter the Pierrot Yarns contest. The idea behind the yarn is to showcase the company’s yarns, so you can enter any item you’ve either knit, crocheted, or woven with one of their yarns.

There are some pretty nice prizes (gift certificates, books, etc.). Plus, everyone who enters something in the contest receives an entry prize, so there’s nothing to lose, right?

Japanese pattern-reading tutorial: Lesson 5b knitting

Without further ado, I want to finish up the pattern-reading tutorial for the kid’s sweater. (Sorry that it took me so long to do the final lesson – real life interfered for a while.)

OK, so what’s left is the front neckline and the finishing. Here’s what the schematic for the entire front looks like:
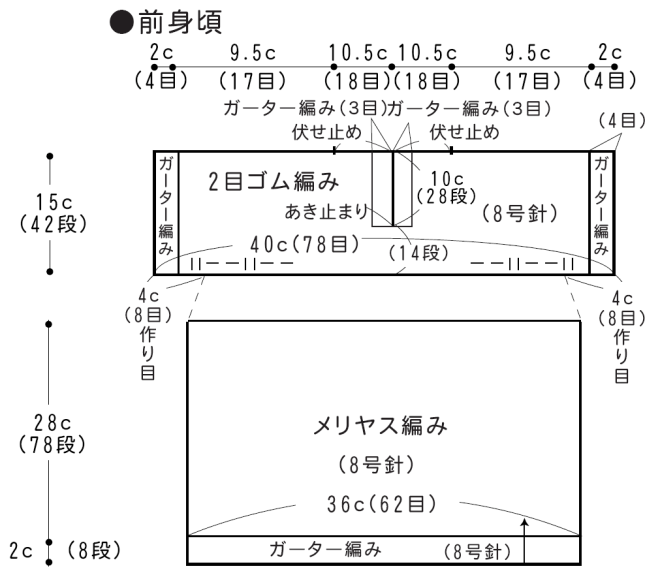
front schematic

Up until the collar, it’s identical to the back piece. (Note that there’s probably a typo on the front schematic. It says that the top section should be 40cm and 78 sts, while the back piece says 44cm and 78 sts. Since the stitch pattern (k2p2 ribbing) and needle size are identical, I can only assume the front should be 44cm as well.)

So let’s zoom in on the collar and see what’s going on there:
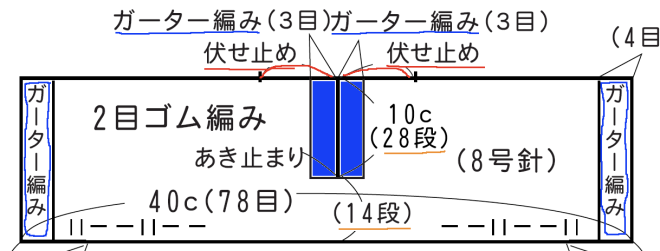
collar detail

It’s pretty busy, but I’ve marked the important parts (i.e., the parts different from the back). The blue at the sides is garter stitch, just like for the back piece. The blue in the center is for the collar. Basically, after 14 rows (marked in orange), you begin working the front sides separately, with garter stitch on each edge of the collar. The text above the collar tells us that these garter stitch edges on the collar should be 3 sts (on each side). The collar is worked for 28 rows (marked in orange), while continuing the k2p2 ribbing for the rest of the front. Marked in red at the top is instructions to bind off. So bind off all the stitches between the two black marks. (I accidentally cut off the measurement marks at the top, but if you look at the schematic of the entire front, you can tell it’s 18 sts between the black BO mark and the collar, so you bind off 36 sts in total – 18 sts on each side of the collar.)

Now for finishing. We know that we have to bind off stitches for the collar, as shown in the schematic. That implies that the rest of the stitches are not bound off. Those who can read Japanese know that the tips section at the top suggests kabuse-hagi as the join method for the shoulders. I’m familiar with this technique from machine knitting, but as far as I know, it has no English name in hand-knitting terms. But let’s assume you can’t read the Japanese bind-off suggestion. What to do? Well, choose a bind-off that makes sense for your particular pattern. Since the shoulders have been worked in k2p2 ribbing, Kitchener stitch might be a nice method. Others might choose a 3-needle bind-off – really, any join method you prefer will work. Likewise, the instructions say to join the sides with mattress stitch. However, if you didn’t know that, you’d just choose whatever method you find most appropriate.

The only part left after that is the tassels on the collar, as seen in the photo of the finished pattern.

fringe diagram

Basically, we’re shown that there are two tassels, each one attached to one lapel. The text in the middle informs us where they’re located relative to the center of the collar. The text at the side tells us how to make the tassels. Remember how in the first lesson I mentioned that if you see 2本どり it means to use 2 strands of yarn? Well here in the tassel instructions we see 5本どり which shows us that the tassels are each made with 5 strands of yarn. It also says 14cm, so the tassels are made with 5 strands of yarn, each 14cm long. No specific instructions are given for attaching them to the sweater, so use whatever method you want.

So that takes us to the end of this sweater tutorial. Any questions about this particular pattern, or using Japanese knitting/crochet patterns in general? Just leave a comment and I’ll answer to the best of my ability.

p.s. Don’t forget about the Pierrot Yarns knitting and crochet contest! The deadline is May 31, and there are some really great prizes. I can’t enter myself (it wouldn’t be fair, since I’m employed as their translator), but I’m eager to see what other people enter. I’m sure there will be some really beautiful items.